
How I Installed NVIDIA Drivers on an Azure H100 VM (Airgapped Setup)
A Step-by-Step Guide to Installing NVIDIA Drivers and CUDA on Azure H100 SXM VMs in Airgapped Environments


Recently, I had to bring up a powerful Azure ND96isr H100 v5 VM—equipped with 8x H100 GPUs—Server is not connected to the internet, so I cannot install packages directly from the internet.
There was no good guide out there. So I wrote one.
This post explains:
How to detect the GPU architecture without drivers
How to select the right NVIDIA driver and CUDA toolkit
Why Fabric Manager is crucial in multi-GPU setups
How to perform a clean, offline installation in airgapped environments
Let’s dive in 👇
Step 0: Detect the GPU Type Before Installing Anything
This step is really important, if you get this wrong, your code will not detect GPU.
You will see similar error like this
packages/torch/cuda/__init__.py:174: UserWarning: CUDA initialization: Unexpected error from cudaGetDeviceCount(). Did you run some cuda functions before calling NumCudaDevices() that might have already set an error? Error 802: system not yet initialized (Triggered internally at /pytorch/c10/cuda/CUDAFunctions.cpp:109.)
  return torch._C._cuda_getDeviceCount() > 0

RuntimeError: Unexpected error from cudaGetDeviceCount(). Did you run some cuda functions before calling NumCudaDevices() that might have already set an error? Error 802: system not yet initialized
Hence you need to find out the GPU type first and download the correct NVIDIA driver. In my case Azure ND96isr H100 v5 VM is SXM (NVLink) GPUs.
So how do you know if your VM has PCIe or SXM (NVLink) GPUs? I googled “Azure ND96isr H100 v5” and found the following link and confirmed my GPU type.
https://learn.microsoft.com/en-us/azure/virtual-machines/sizes/gpu-accelerated/ndh100v5-series?tabs=sizebasic
Use the VM Type
If you’re using this VM:
Standard_ND96isr_H100_v5
You are 100% using NVIDIA H100 SXM5 GPUs with NVLink 4.0, hosted on an HGX board with 8 GPUs.
📄 Microsoft confirms this:
👉 ND H100 v5-series VM Sizes
✅ Double-Check with lspci
Even without NVIDIA tools, you can still confirm GPU info:
lspci | grep -i nvidia
You should see something like:
82:00.0 3D controller: NVIDIA Corporation H100 SXM5 (rev a1)
Look for the SXM5 identifier. That means NVLink. If it said PCIe, you’d be on a different form factor.

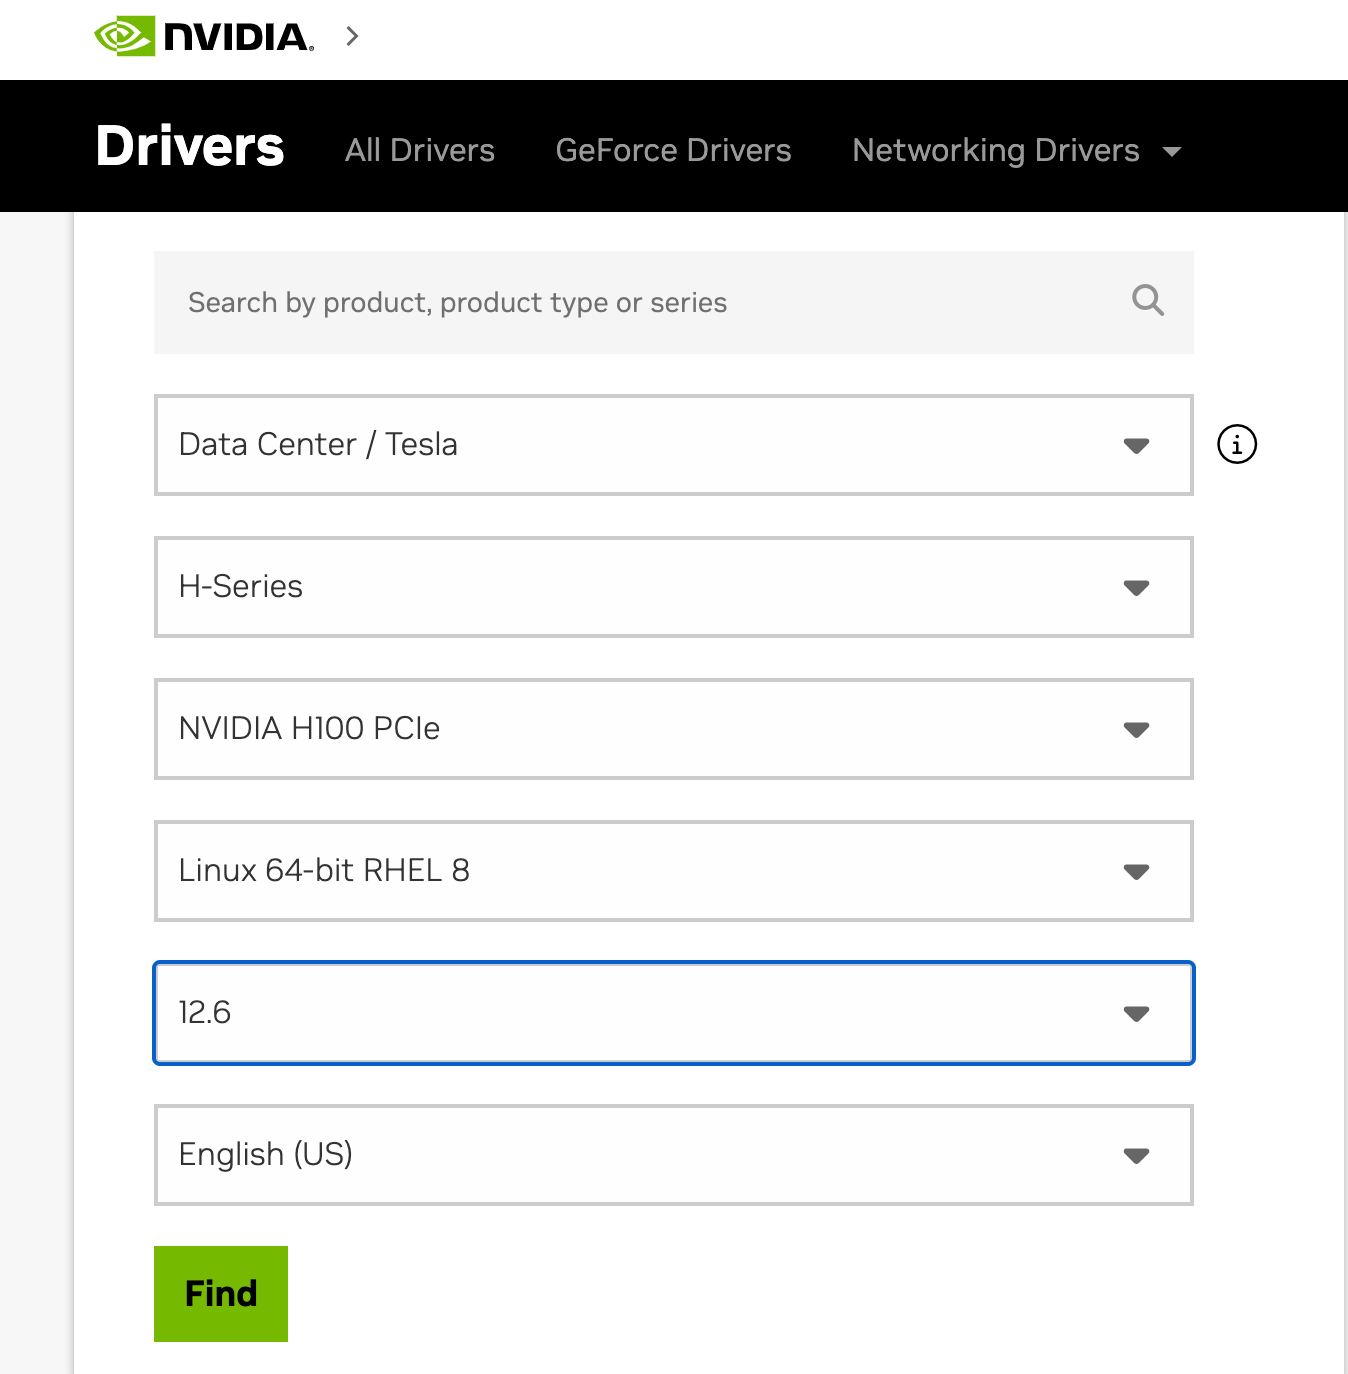
Step 1: Choose the Correct NVIDIA Driver (Offline)
Go to the NVIDIA driver download page from a machine with internet access:
Product Series: Data Center / Tesla
Product: H100 SXM
OS: Linux 64-bit (match your distro)
Type:
.runor.rpmpackage
💡 For airgapped installs, I recommend downloading the
local rpm bundle. It bundles all the needed components and works across distros.
Save the file and transfer it to your VM using Azure Files, USB, or a trusted intermediate system.
Step 2: Download the Correct CUDA Toolkit
The driver and CUDA versions must match. Use the CUDA Compatibility Matrix to match your driver version.
💡 For example:
If you're using CUDA 12.4, install driver version ≥ 550.x
If you're using CUDA 12.2, use driver ~535.x
In my case I chose 12.6 and driver version ≥ 560.x
I downloaded the bundle from a machine which has internet connection allowed then transfered to this server. Remember this package doesn’t install cuda tool kit. It simply install the cuda drivers and nvida driver.
once it is uploaded to the server, you can simply install the driver using the following command
sudo rpm -i nvidia-driver-local-repo-rhel8-560.35.03-1.0-1.x86_64.rpm
sudo dnf clean all
sudo dnf -y module install nvidia-driver:latest-dkms
Verify NVIDIA driver installation
Once the driver is installed simply run the following command.
nvidia-smi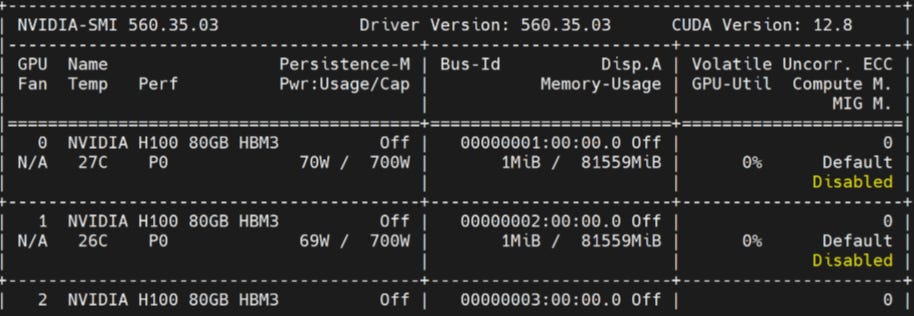
You will see a similar output. Next you need to reboot the server before proceed.
sudo reboot Once it is rebooted, we will proceed to install Fabric manager.
Why Fabric Manager is Required
When you're running multi-GPU H100 SXM setups, you also need Nvidia Fabric manager.
This manages the NVSwitch and NVLink interconnects between GPUs. Without it, your H100 SXM GPUs won’t fully communicate—and nvidia-smi may only show partial GPU visibility.
Install Fabric Manager matching your driver version
Replace 560 with your exact driver version (check using nvidia-smi)
sudo dnf install -y nvidia-fabricmanager-560
Enable and start the service
sudo systemctl enable nvidia-fabricmanager
sudo systemctl start nvidia-fabricmanager
Once the fabric manager is installed, make sure to reboot the server.
Install CUDA Toolkit
The CUDA Toolkit is needed when you want to develop or run applications that use NVIDIA GPUs for compute tasks (like AI/ML, simulations, video processing, etc.).
It includes:
nvcc: the CUDA compiler to build GPU codeCUDA libraries (cuBLAS, cuDNN, NCCL, etc.)
Headers and APIs for writing GPU-accelerated applications
Runtime libraries required by many Python packages like PyTorch or TensorFlow
https://developer.nvidia.com/cuda-12-6-0-download-archive
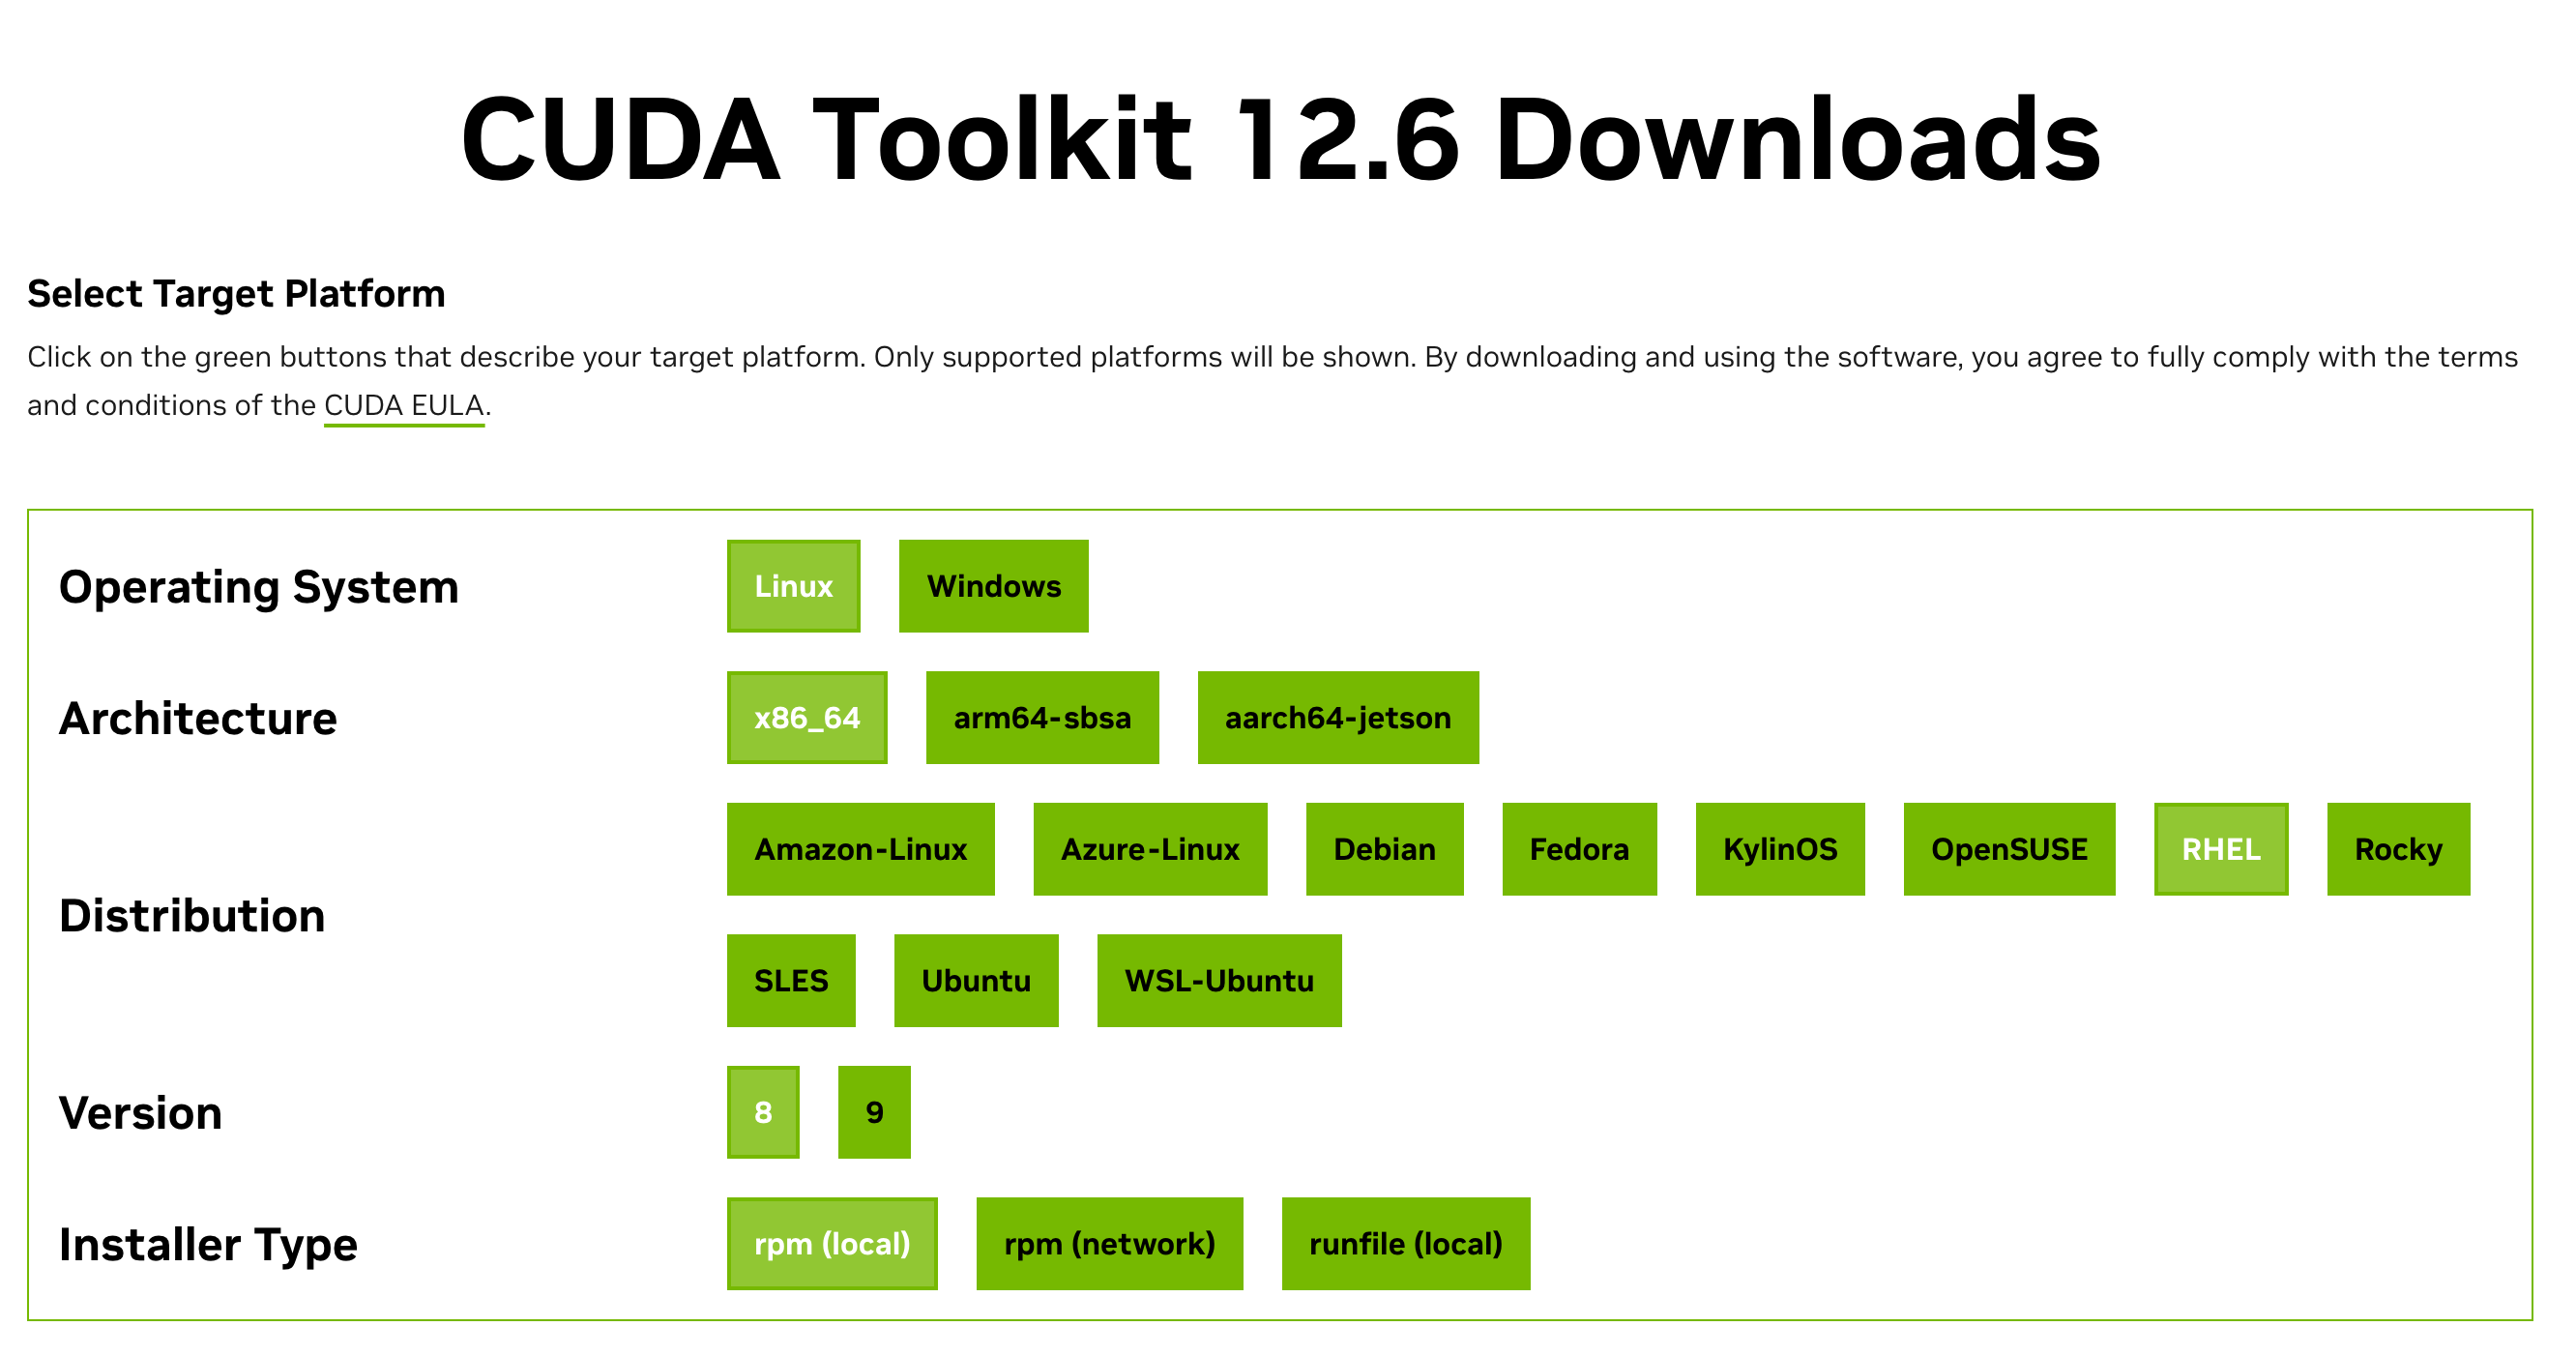
sudo rpm -i cuda-repo-rhel8-12-6-local-12.6.0_560.28.03-1.x86_64.rpm
sudo dnf clean all
sudo dnf -y install cuda-toolkit-12-6
Update your environment:
echo 'export PATH=/usr/local/cuda/bin:$PATH' >> ~/.bashrc
echo 'export LD_LIBRARY_PATH=/usr/local/cuda/lib64:$LD_LIBRARY_PATH' >> ~/.bashrc
source ~/.bashrc
✅ Final Verification
Now that everything is installed, verify it all works:
nvidia-smi
nvcc --version
Run a simple PyTorch test:
import torch
print("CUDA available:", torch.cuda.is_available())
print(torch.cuda.get_device_name(0))
📬 Stay Tuned
I’ll follow this up with:
Deploying vLLM on Kubernetes with H100s
Running LiteLLM Gateway in airgapped clusters
Benchmarking Mistral-7B on SXM H100s
Subscribe to Kubenatives for weekly insights into real-world DevOps, MLOps, and cloud-native architectures.