
Kubernetes Upgrade Strategy: kubeadm Cluster Upgrades Without Downtime
Kubernetes drops support for old versions every 12 months. Here is how to upgrade without breaking production.

Kubernetes releases a new minor version every 4 months. Each version is supported for 14 months. After that, no more security patches. No more bug fixes.
If you are running 1.28 and the current version is 1.32, you are 4 versions behind. That is 3 sequential upgrades to catch up. Each one can break things.
Most teams put off upgrades because they are scared. The upgrade process is poorly documented for production environments. The official docs cover the happy path. They do not cover what happens when something goes wrong mid-upgrade.
This article covers the full upgrade strategy: planning, pre-flight checks, the upgrade itself, and what to do when things break.
Understanding the Upgrade Path
Kubernetes does not support skipping minor versions. You must upgrade one minor version at a time.
1.28 → 1.29 → 1.30 → 1.31 → 1.32
You cannot go directly from 1.28 to 1.32. Each hop requires a full upgrade cycle: control plane first, then worker nodes.
Within each minor version, you can jump patch versions freely. Going from 1.30.2 to 1.30.8 is safe and does not require the full upgrade procedure. Just update the kubelet and kubectl binaries.
The support window:
Version    Released     End of Support
1.30       Apr 2024     Jun 2025
1.31       Aug 2024     Oct 2025
1.32       Dec 2024     Feb 2026
1.33       Apr 2025     Jun 2026
If you are more than 2 versions behind the current release, prioritize upgrading. You are running on borrowed time.
Pre-Upgrade Checklist
Run these checks before every upgrade. Do not skip them. They catch 90% of upgrade failures before they happen.

Check 1: Read the changelog for breaking changes
Every Kubernetes release removes deprecated APIs, changes default behaviors, and sometimes breaks addons.
# Check for deprecated APIs in your cluster
# Install kubent (kube-no-trouble)
kubectl krew install deprecations

# Or use the standalone tool
kubent
kubent scans your cluster for resources using deprecated or removed APIs. If it finds any, update those resources BEFORE upgrading. An API that was deprecated in 1.30 might be removed in 1.32. Your manifests will fail to apply after the upgrade.
Check 2: Verify addon compatibility
Your CNI plugin (Calico, Cilium, Flannel), CSI drivers, ingress controller, and cert-manager all have Kubernetes version requirements. Check each one against the target version.
# Check current versions of critical addons
kubectl get pods -n kube-system -o custom-columns=\
  NAME:.metadata.name,\
  IMAGE:.spec.containers[0].image
If your CNI plugin does not support the target Kubernetes version, upgrade the CNI first.
Check 3: Back up etcd
This is non-negotiable. If the upgrade fails catastrophically, the etcd backup is your recovery path.
etcdctl snapshot save /var/backups/etcd/pre-upgrade-$(date +%Y%m%d).db \
  --endpoints=https://127.0.0.1:2379 \
  --cacert=/etc/kubernetes/pki/etcd/ca.crt \
  --cert=/etc/kubernetes/pki/etcd/server.crt \
  --key=/etc/kubernetes/pki/etcd/server.key

# Verify the snapshot
etcdctl snapshot status /var/backups/etcd/pre-upgrade-*.db --write-out=table
Copy the backup off the control plane node. If the node dies during upgrade, the backup on the node is useless.
Check 4: Verify PodDisruptionBudgets
PDBs control how many pods can be unavailable during node drains. If a PDB prevents draining, the upgrade stalls.
# List all PDBs
kubectl get pdb --all-namespaces

# Check for PDBs that might block drains
kubectl get pdb --all-namespaces -o jsonpath='{range .items[*]}{.metadata.namespace}/{.metadata.name}: minAvailable={.spec.minAvailable} maxUnavailable={.spec.maxUnavailable}{"\n"}{end}'
A PDB with minAvailable equal to the current replica count blocks all drains. Either increase replicas or temporarily relax the PDB during upgrades.
Check 5: Dry run the upgrade
# On the first control plane node
sudo kubeadm upgrade plan
This shows exactly what will be upgraded and flags any issues. If it reports errors, fix them before proceeding.
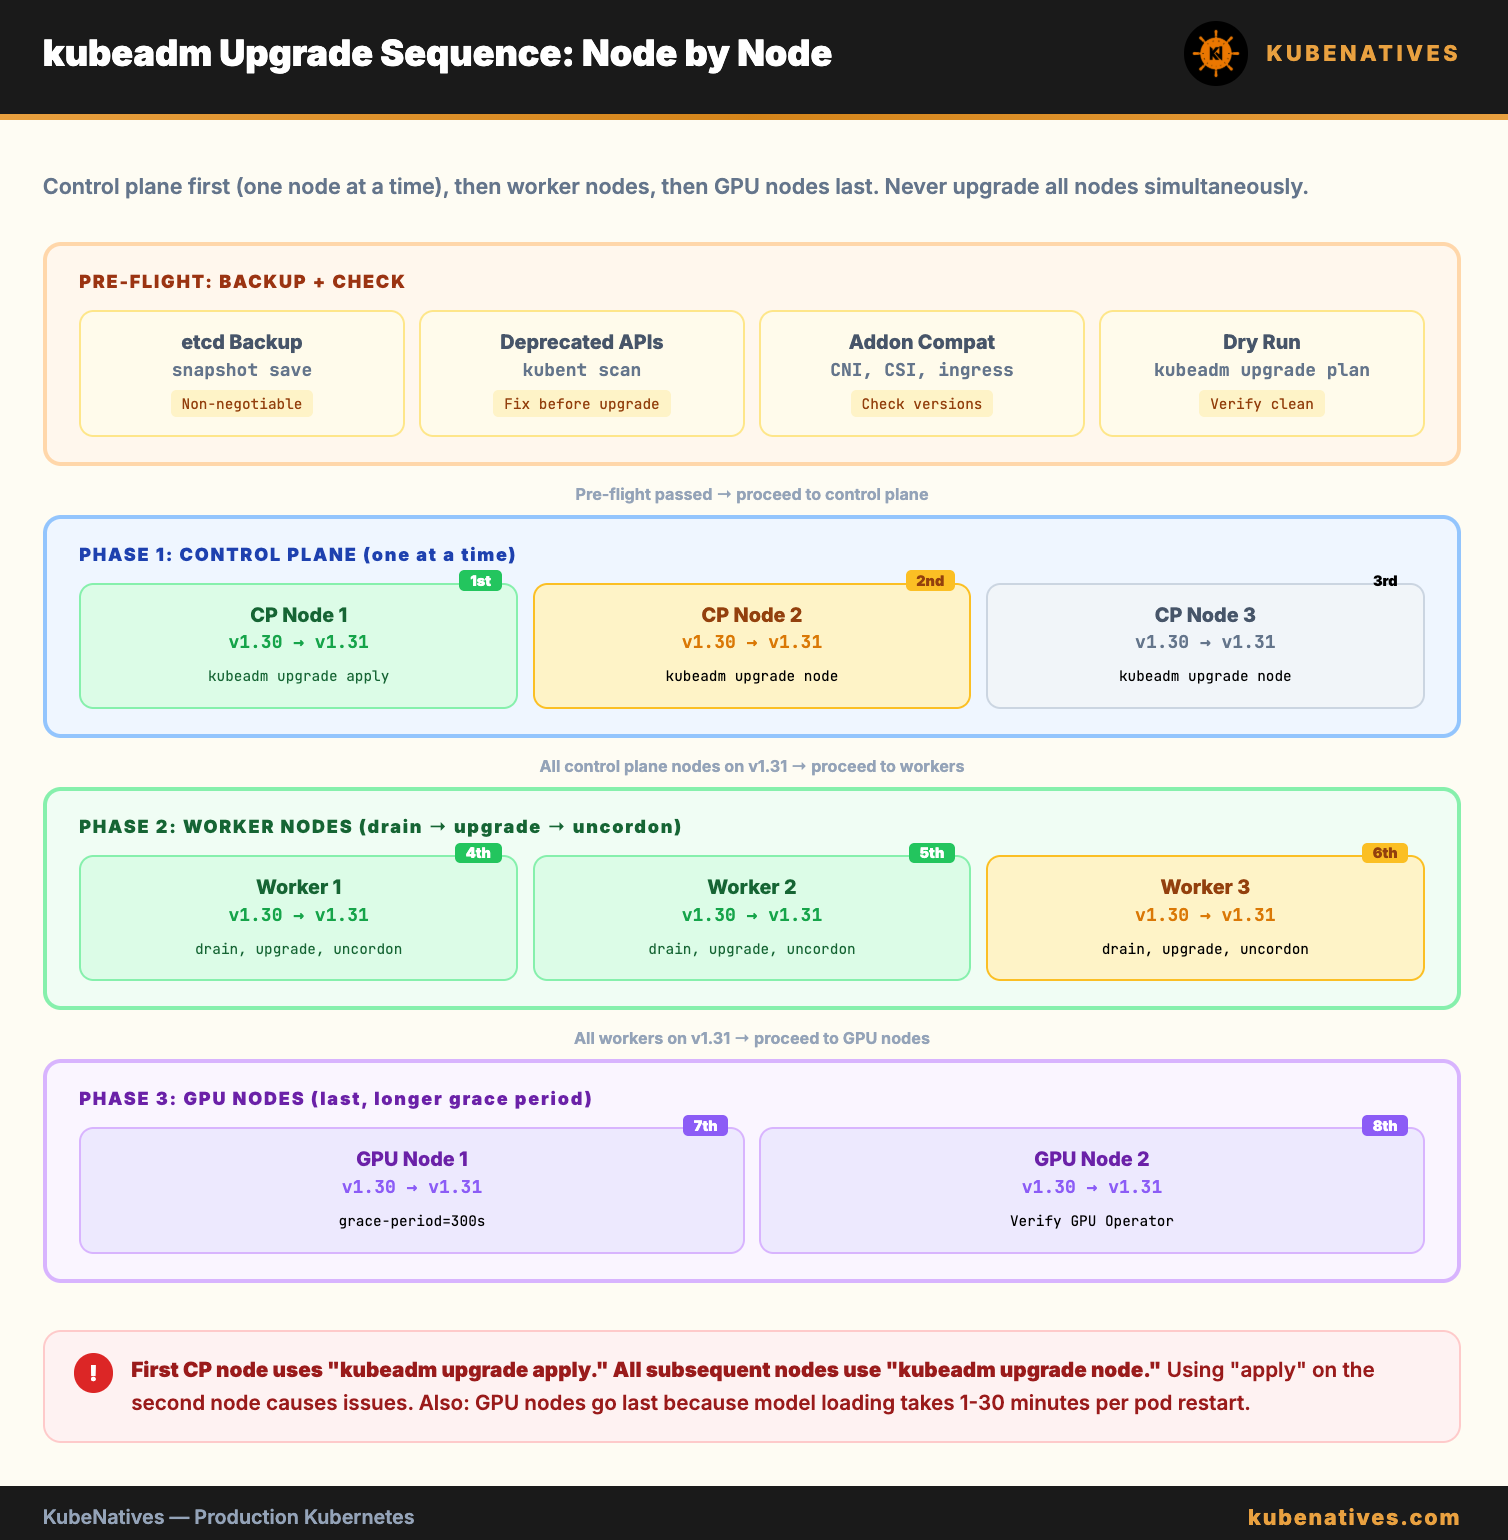
Upgrading the Control Plane
The control plane upgrades one node at a time. Never upgrade all control plane nodes simultaneously.
Step 1: Upgrade kubeadm on the first control plane node
# Update the package repository
sudo apt-get update

# Install the target version of kubeadm
sudo apt-get install -y kubeadm=1.31.0-1.1

# Verify
kubeadm version
Step 2: Apply the upgrade
# On the FIRST control plane node only
sudo kubeadm upgrade apply v1.31.0
This upgrades the API server, controller manager, scheduler, and kube-proxy on this node. etcd is upgraded if it is managed by kubeadm (stacked topology).
Expected output:
[upgrade/successful] SUCCESS! Your cluster was upgraded to "v1.31.0". Enjoy!
If it fails, do NOT proceed. Check the error. Common failures: etcd health check fails (fix etcd first), certificate issues (renew with kubeadm certs renew all), or insufficient disk space.
Step 3: Upgrade kubelet and kubectl on the first node
sudo apt-get install -y kubelet=1.31.0-1.1 kubectl=1.31.0-1.1
sudo systemctl daemon-reload
sudo systemctl restart kubelet
Step 4: Verify the first node
kubectl get nodes
# The upgraded node should show v1.31.0
# Other nodes still show the old version - this is expected
Step 5: Upgrade remaining control plane nodes
On each additional control plane node:
sudo apt-get install -y kubeadm=1.31.0-1.1

# Note: use "upgrade node" not "upgrade apply" for subsequent nodes
sudo kubeadm upgrade node

sudo apt-get install -y kubelet=1.31.0-1.1 kubectl=1.31.0-1.1
sudo systemctl daemon-reload
sudo systemctl restart kubelet
Wait for each node to show Ready before moving to the next.
Upgrading Worker Nodes
Worker nodes upgrade one at a time (or in batches if you have capacity).
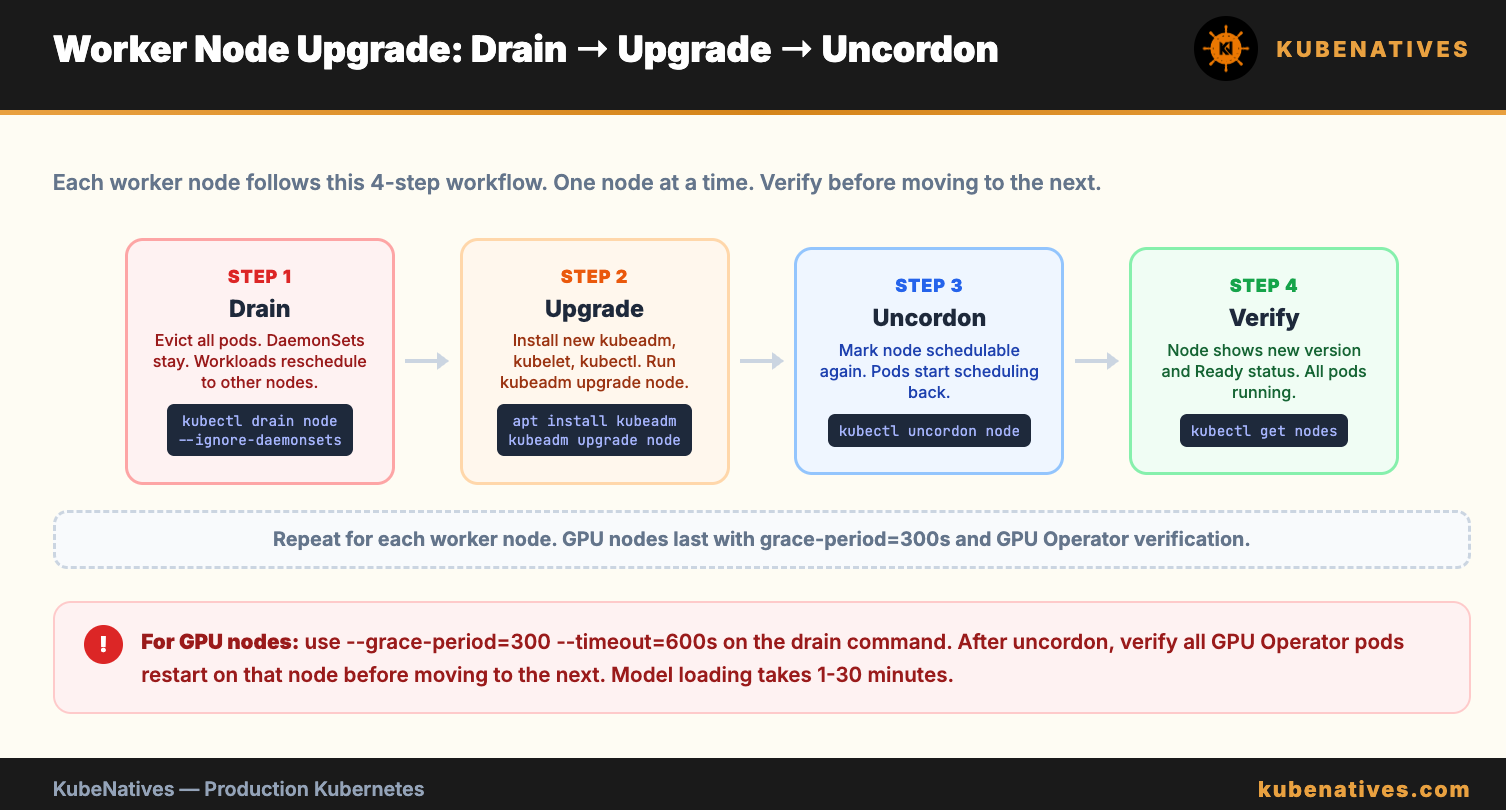
Step 1: Drain the node
kubectl drain <node-name> \
  --ignore-daemonsets \
  --delete-emptydir-data \
  --grace-period=120 \
  --timeout=300s
This evicts all pods from the node. DaemonSets stay (they run on every node). Pods with emptyDir volumes lose their data.
Step 2: Upgrade kubeadm, kubelet, kubectl
# SSH into the worker node
sudo apt-get update
sudo apt-get install -y kubeadm=1.31.0-1.1
sudo kubeadm upgrade node
sudo apt-get install -y kubelet=1.31.0-1.1 kubectl=1.31.0-1.1
sudo systemctl daemon-reload
sudo systemctl restart kubelet
Step 3: Uncordon the node
kubectl uncordon <node-name>
The node is now schedulable again. Pods will be scheduled back onto it.
Step 4: Verify and move to the next node
kubectl get nodes
# Upgraded node shows v1.31.0 and Ready status
Repeat for each worker node. If you have GPU nodes, upgrade them last. GPU pods take longer to reschedule because of model loading times.
Handling GPU Nodes During Upgrades
GPU nodes need special attention:
The GPU Operator must be compatible with the target Kubernetes version. Check the NVIDIA GPU Operator compatibility matrix before upgrading.
vLLM pods take 1 to 30 minutes to restart (model loading). Plan for this downtime per node. If you have a PVC-backed model cache, restart is faster (1 to 3 minutes instead of 30).
Drain GPU nodes with a longer grace period:
kubectl drain gpu-node-1 \
  --ignore-daemonsets \
  --delete-emptydir-data \
  --grace-period=300 \
  --timeout=600s
After uncordoning, verify the GPU Operator components restart correctly:
kubectl get pods -n gpu-operator -o wide | grep gpu-node-1
All GPU Operator pods on that node should be Running before proceeding to the next GPU node.
Post-Upgrade Validation
Run these checks after all nodes are upgraded:
# 1. All nodes on the new version and Ready
kubectl get nodes

# 2. All system pods healthy
kubectl get pods -n kube-system

# 3. etcd cluster healthy
etcdctl endpoint health --cluster

# 4. DNS working
kubectl run dns-test --image=busybox:1.36 --rm -it --restart=Never -- nslookup kubernetes.default

# 5. Create and delete a test resource
kubectl create configmap upgrade-test --from-literal=version=1.31
kubectl delete configmap upgrade-test

# 6. Check for pods in bad states
kubectl get pods --all-namespaces --field-selector status.phase!=Running,status.phase!=Succeeded

# 7. Verify GPU workloads (if applicable)
kubectl get pods -n inference
Rollback Strategy
If the upgrade fails mid-way:
For control plane: restore from the etcd backup taken in the pre-upgrade checklist. This rolls back the cluster state to before the upgrade.
For worker nodes: the failed node can be drained and reimaged with the old version. Other nodes continue running normally.
The key: always have the etcd backup. Without it, there is no rollback. The pre-upgrade etcd snapshot is your safety net.
The Bottom Line
Kubernetes upgrades are not optional. The support window is 14 months. After that, you are running unpatched software in production.
The process: back up etcd, check deprecated APIs, verify addon compatibility, upgrade control plane one node at a time, upgrade workers one node at a time, validate everything.
Do not skip the pre-flight checks. Do not upgrade all nodes at once. Do not skip the etcd backup. These three mistakes cause 90% of upgrade failures.
Next week: Autoscaling Inference Workloads: HPA and KEDA for GPU Pods.
If you are running self-managed Kubernetes clusters, I cover operations, upgrades, and GPU infrastructure every week. Subscribe at kubenatives.com.