
Production Runbook: etcd NOSPACE Emergency Recovery
Your cluster just went read only. Here is how to fix it in under 10 minutes.

The etcd NOSPACE alarm is one of the most stressful moments in Kubernetes operations. Your cluster stops accepting writes. No new pods. No new deployments. No ConfigMap updates. No scaling. Nothing changes.
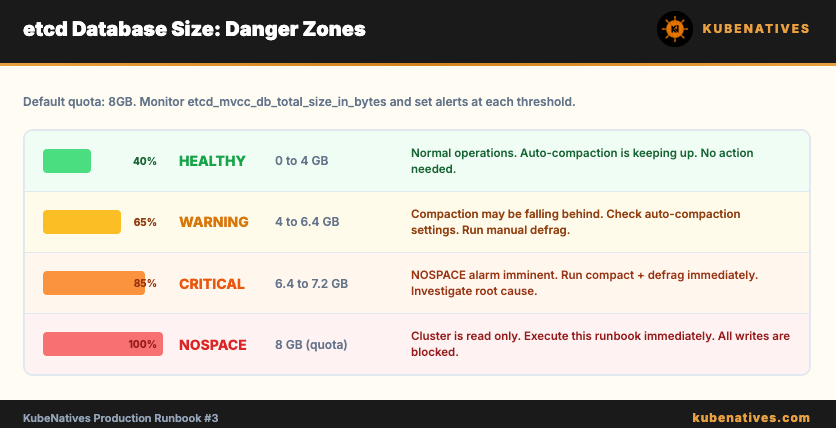
The alarm triggers when the etcd database exceeds its storage quota (default 8GB). etcd switches to read-only mode to prevent the disk from filling up entirely.
This runbook gives you the exact recovery sequence. Every step has a command, a validation check, and an explanation of what is happening. The goal is to go from a read-only cluster to a fully operational one in under 10 minutes.
Severity: Critical. Cluster is read-only. All write operations fail.
Symptoms:
etcdserver: mvcc: database space exceedederrors in API server logskubectl applyreturnsetcdserver: mvcc: database space exceededkubectl createfails for any resource typekubectl deletemay also failExisting workloads continue running but cannot be modified
Time to resolution: 5-10 minutes using this runbook.
Step 0: Confirm the NOSPACE Alarm
Before doing anything, confirm this is actually a NOSPACE alarm and not a different etcd issue.
# Check for active alarms
ETCDCTL_API=3 etcdctl alarm list \
  --endpoints=https://127.0.0.1:2379 \
  --cacert=/etc/kubernetes/pki/etcd/ca.crt \
  --cert=/etc/kubernetes/pki/etcd/server.crt \
  --key=/etc/kubernetes/pki/etcd/server.key
Expected output if NOSPACE:
memberID:xxxxxxxxxxxx alarm:NOSPACE
memberID:yyyyyyyyyyyy alarm:NOSPACE
memberID:zzzzzzzzzzzz alarm:NOSPACE
If you see alarm:NOSPACE on any member, this runbook applies. If you see no alarms, the problem is something else. Check API server logs and etcd pod status instead.
# Also check current database size
ETCDCTL_API=3 etcdctl endpoint status --write-out=table \
  --endpoints=https://127.0.0.1:2379 \
  --cacert=/etc/kubernetes/pki/etcd/ca.crt \
  --cert=/etc/kubernetes/pki/etcd/server.crt \
  --key=/etc/kubernetes/pki/etcd/server.key
Look at the DB SIZE column. If it is close to or exceeding the quota (default 8GB, shown in the output), you have confirmed the cause.
Step 1: Take an Emergency Backup
Even in an emergency, take a backup first. This takes 10 seconds and gives you a recovery point if anything goes wrong.
# Emergency backup
ETCDCTL_API=3 etcdctl snapshot save /tmp/etcd-emergency-nospace.db \
  --endpoints=https://127.0.0.1:2379 \
  --cacert=/etc/kubernetes/pki/etcd/ca.crt \
  --cert=/etc/kubernetes/pki/etcd/server.crt \
  --key=/etc/kubernetes/pki/etcd/server.key
Note: This may fail if the cluster is severely degraded. If it fails, skip this step and proceed. Getting the cluster back to a writable state is the priority. You can take a backup after recovery.
# Verify backup (if it succeeded)
ETCDCTL_API=3 etcdctl snapshot status /tmp/etcd-emergency-nospace.db \
  --write-out=table
Validation: Total keys should be a positive number. If the total keys are 0, the backup is empty.
Step 2: Get the Current Revision Number
You need the current revision number for the compaction step. This tells etcd which revision to compact up to.
# Get current revision
ETCDCTL_API=3 etcdctl endpoint status --write-out=json \
  --endpoints=https://127.0.0.1:2379 \
  --cacert=/etc/kubernetes/pki/etcd/ca.crt \
  --cert=/etc/kubernetes/pki/etcd/server.crt \
  --key=/etc/kubernetes/pki/etcd/server.key | python3 -c "
import json,sys
data = json.load(sys.stdin)
print(data[0]['Status']['header']['revision'])
"
Save this number. You will use it in the next step. It will be a large integer like 458329471.
