
What Happens When You Create a Pod in Kubernetes?
Step-by-Step Breakdown of Pod Lifecycle in Kubernetes

Kubenatives Newsletter - Edition #6
When you run:
kubectl apply -f pod.yaml
or
kubectl run nginx --image=nginx
…a lot happens behind the scenes. Kubernetes orchestrates a complex sequence of events that involve API validation, scheduling, networking, storage provisioning, and runtime execution. Let’s break it all down.
Step 1: The Request Reaches the Kubernetes API Server
Your kubectl command sends a REST API request to the kube-apiserver, which is the main entry point for all Kubernetes operations.
🔹 What Happens Here?
Authentication & Authorization
The API server first authenticates you using certificates, bearer tokens, OIDC, or other configured methods.
Next, RBAC (Role-Based Access Control) checks whether you have permission to create a pod in the specified namespace.
Admission Controllers Step In
Kubernetes Admission Controllers (like
ResourceQuota,PodSecurity, andValidatingWebhookConfiguration) validate and mutate the request.For example, if a
LimitRangepolicy exists, it ensures your pod has proper CPU/memory requests and limits.
Data is Stored in etcd
If validation succeeds, the API server stores the pod’s definition in etcd, the cluster’s distributed key-value store.
At this point, the pod exists in etcd but is in a "Pending" state because it hasn’t been scheduled to a node yet.
Step 2: The Scheduler Decides Where the Pod Runs
A newly created pod has no assigned node. This is where the kube-scheduler comes in.
🔹 What Happens Here?
The scheduler monitors the API server for new, unscheduled pods.
It evaluates nodes using a scoring algorithm, considering factors like:
CPU & memory availability
Node taints & tolerations
Pod affinity & anti-affinity rules
Node selectors & constraints (like "zone=us-east-1a")
After selecting the best node, it updates the pod's spec in etcd with the assigned node.
Now, the pod is still Pending, but it has a designated node.
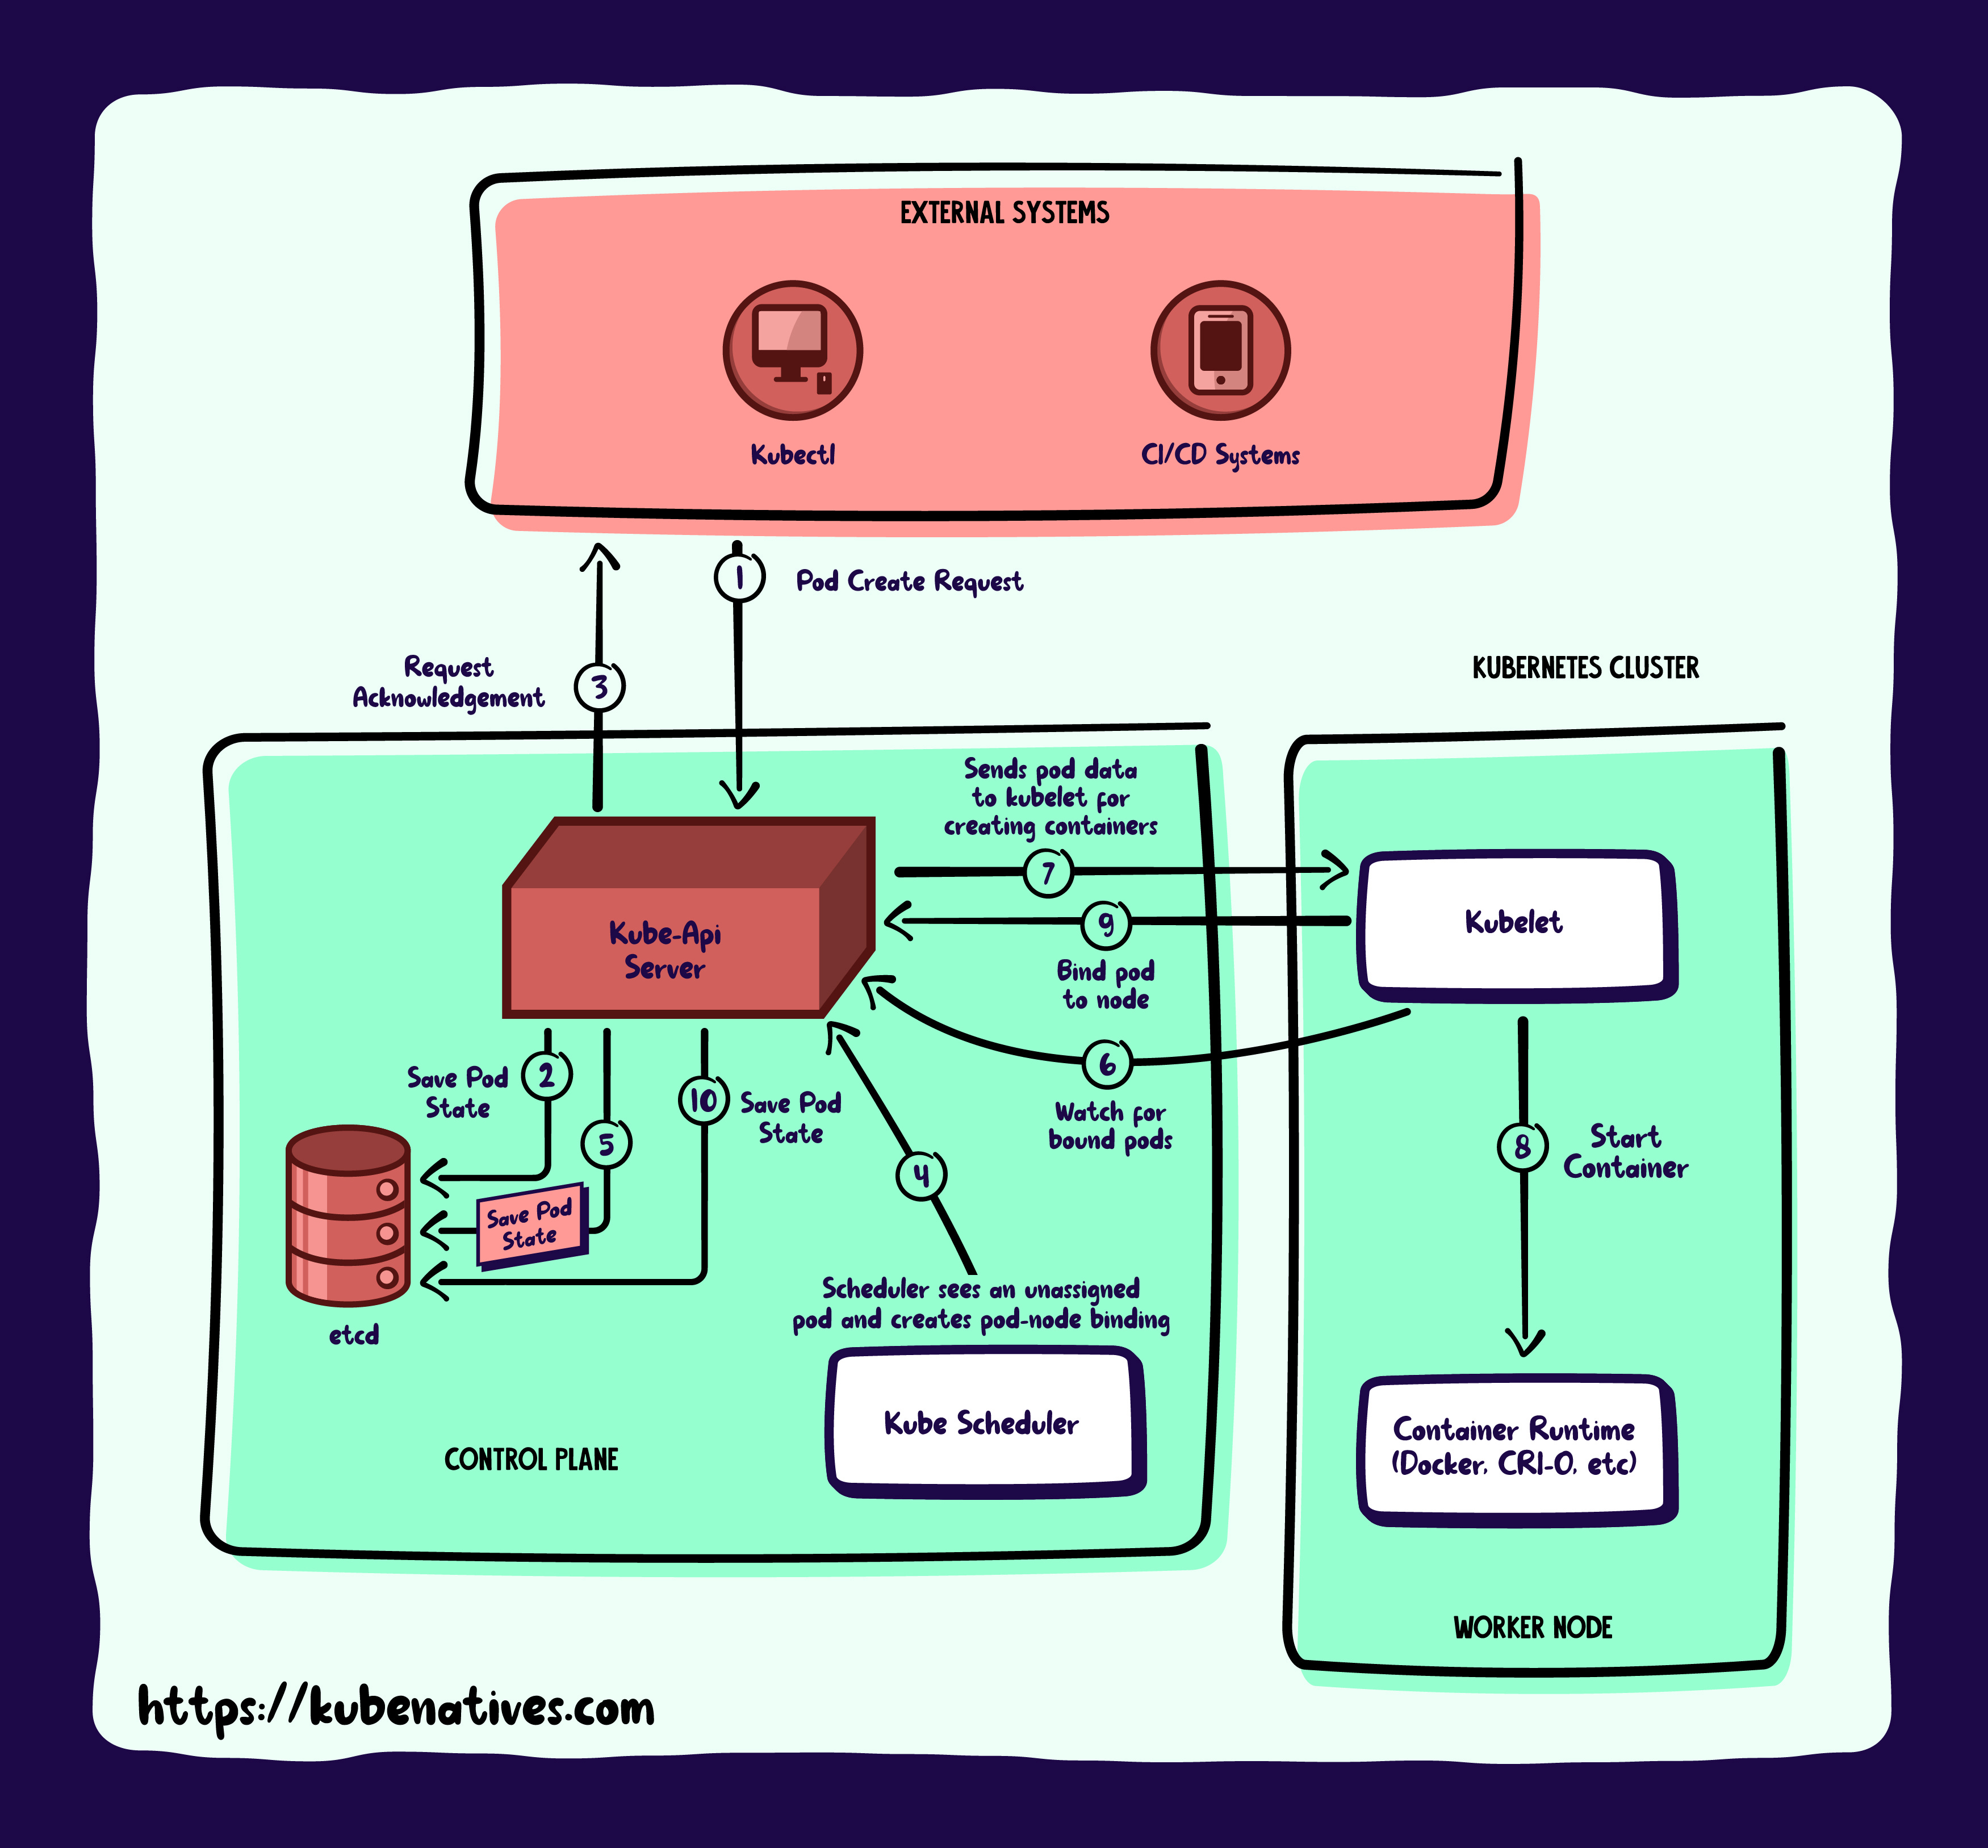
Step 3: The Kubelet Takes Over on the Assigned Node
The kubelet, which runs on every node, continuously watches for assigned pods in the API server.
🔹 What Happens Here?
The kubelet detects a new pod scheduled to its node.
It retrieves the pod specification from the API server.
It requests the container runtime (like containerd or CRI-O) to create and start the containers.
It sets up pod networking and storage volumes.
At this point, the pod enters the "ContainerCreating" state while the container runtime prepares the container.
Step 4: Container Runtime Pulls & Starts the Container
The container runtime (containerd, CRI-O, or Docker) is responsible for managing containers.
🔹 What Happens Here?
The runtime pulls the container image from the specified container registry (e.g., Docker Hub, AWS ECR, Azure ACR).
If the image is already available, it skips this step.
It creates a container sandbox (network namespace, cgroups, etc.).
It executes the container entrypoint command.
If an initContainer is defined, it runs before the main container starts.
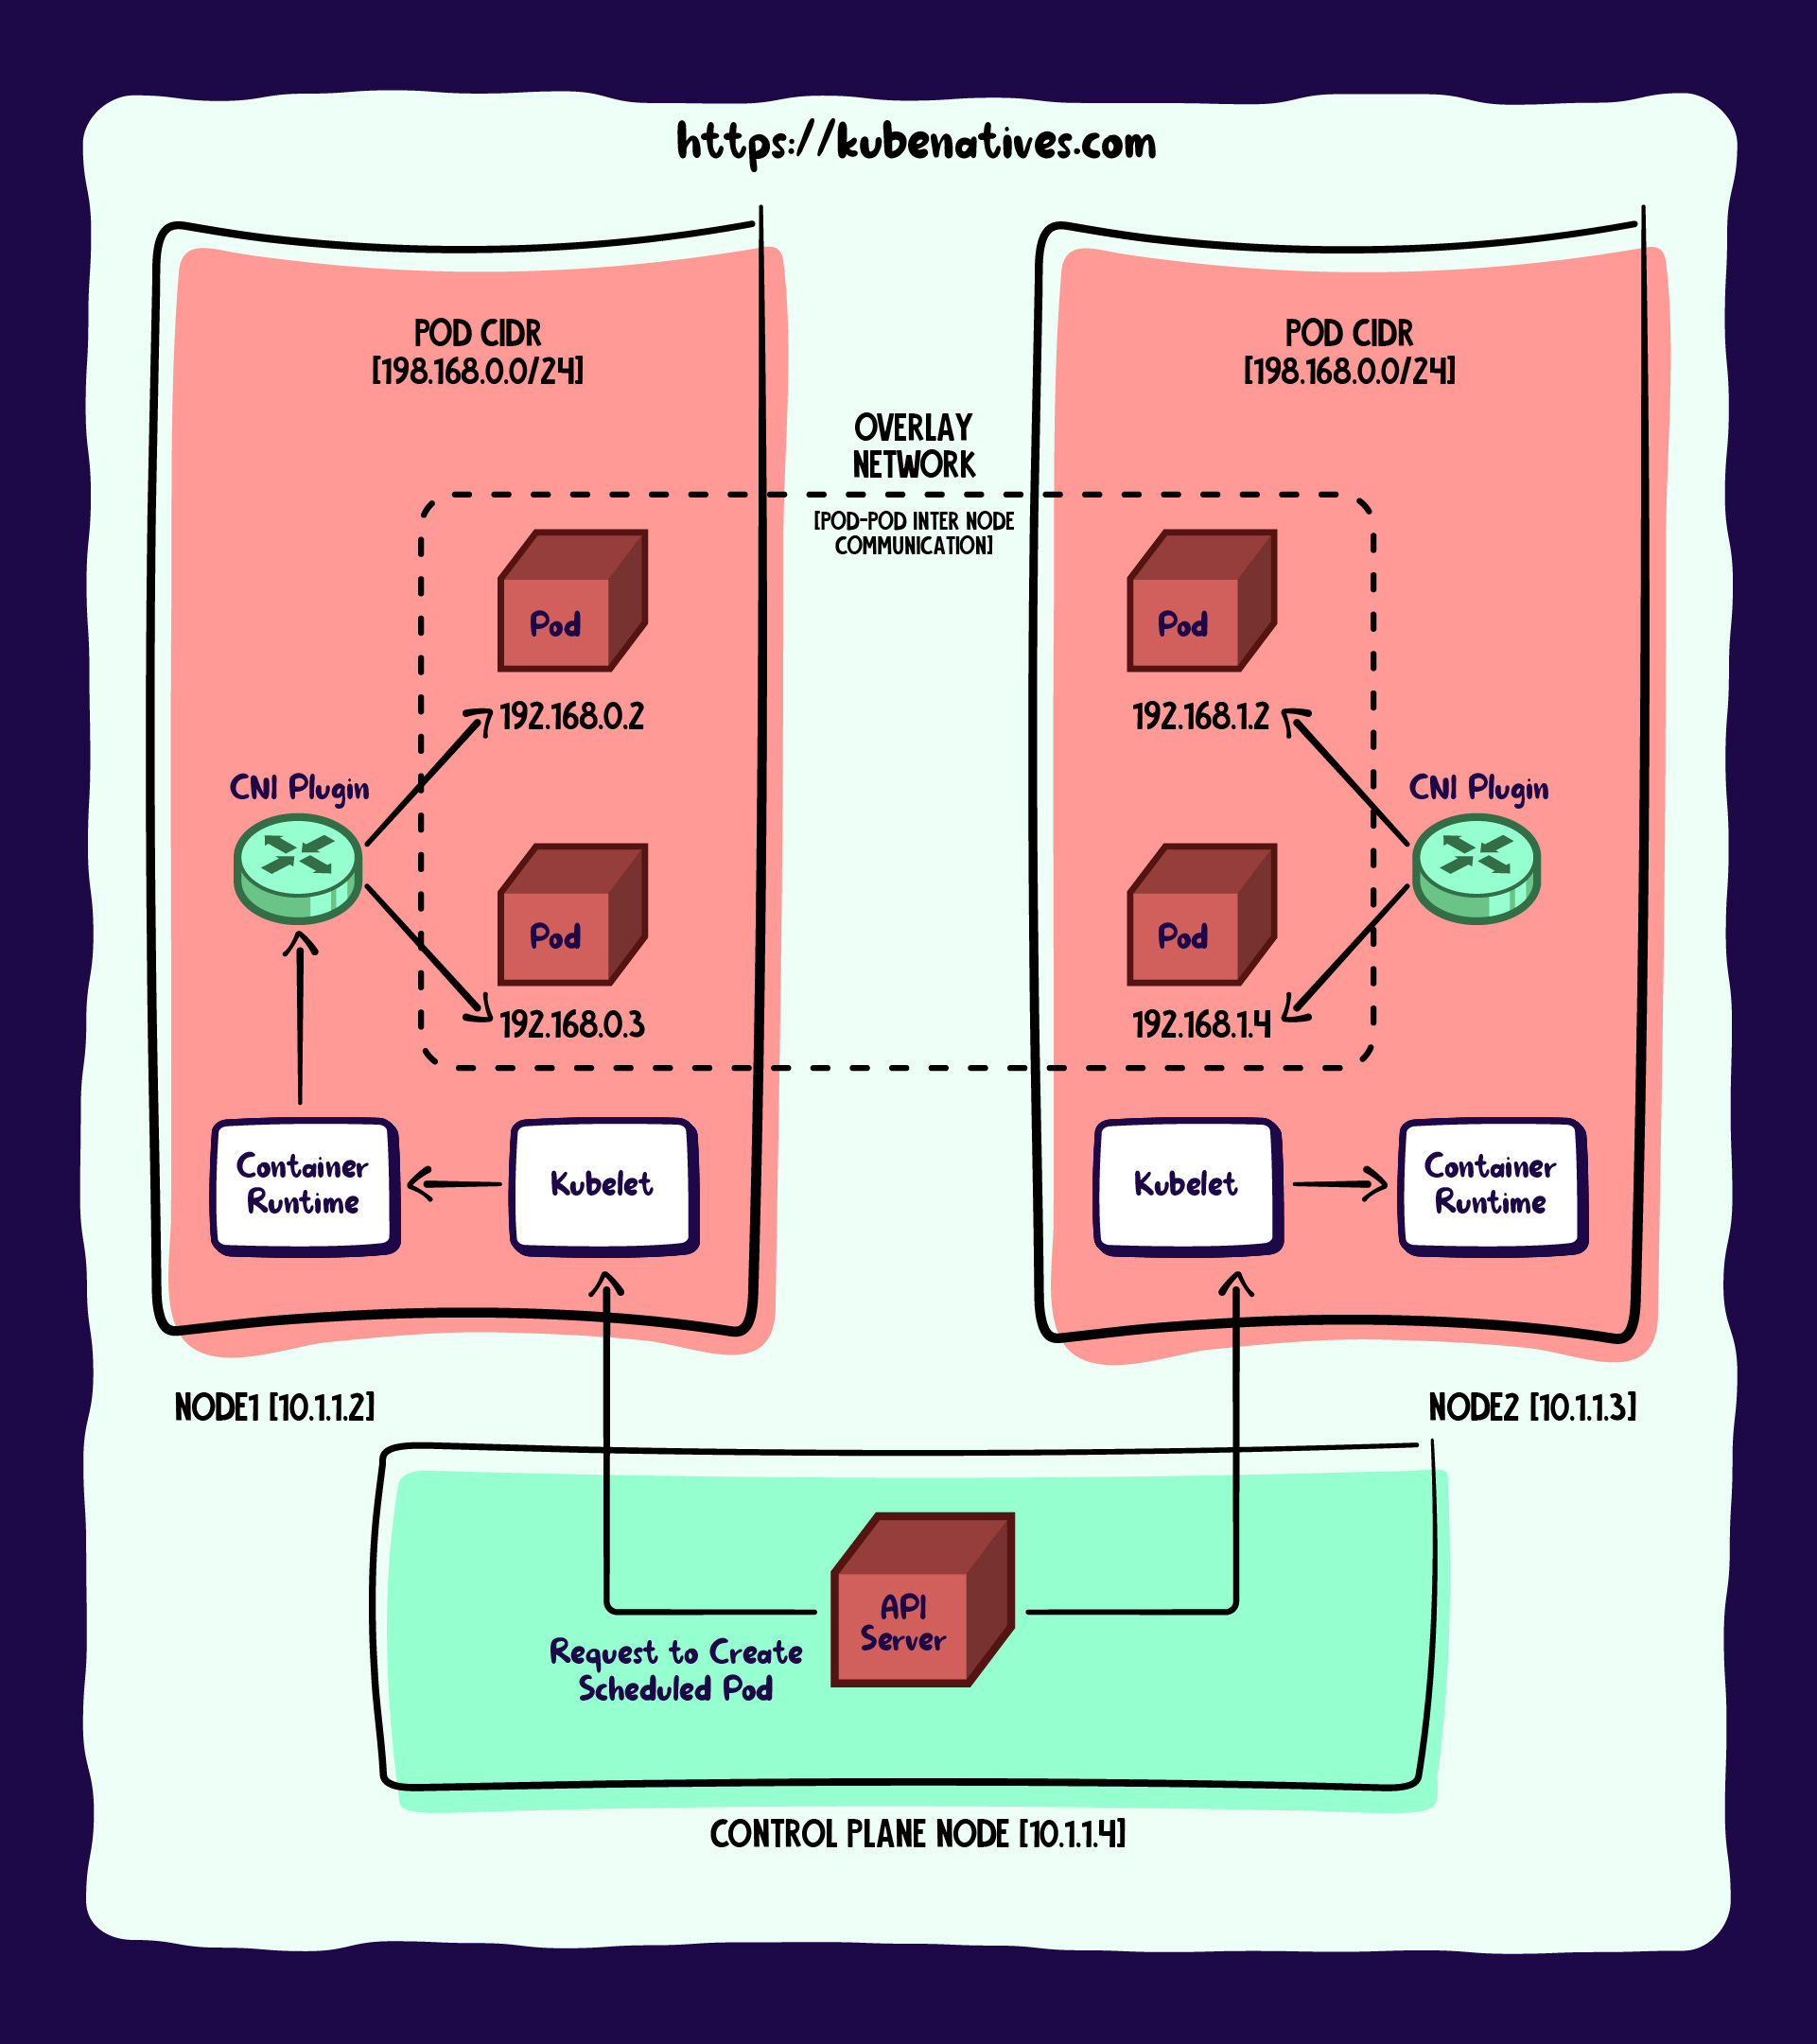
Step 5: Pod Networking Is Configured (CNI Plugin)
The pod needs an IP address and network connectivity. This is handled by Container Network Interface (CNI) plugins, such as:
Flannel
Calico
Cilium
Weave Net
🔹 What Happens Here?
The kubelet calls the CNI plugin to assign an IP address to the pod.
A virtual network interface (veth pair) is created inside the pod’s network namespace.
The pod’s network interface is connected to the node’s bridge or overlay network.
Routing rules are configured so that pods across different nodes can communicate.
Step 6: Storage Volumes Are Mounted
If the pod uses PersistentVolumes (PV) and PersistentVolumeClaims (PVC), Kubernetes must provision and mount storage.
🔹 What Happens Here?
The kubelet checks if the requested storage volume is available.
It binds the PVC to a PV (e.g., an NFS share, EBS volume, Azure Disk).
It mounts the volume inside the pod.
If the pod uses Secrets or ConfigMaps, they are also mounted as files in the container.
Step 7: Readiness & Liveness Probes Start
Once the pod is running, Kubernetes starts monitoring its health.
🔹 Readiness Probe
Checks if the application is ready to accept traffic.
If the readiness probe fails, Kubernetes won’t send traffic to the pod.
🔹 Liveness Probe
Ensures the application is still running.
If the probe fails, Kubernetes restarts the container.
Probes prevent routing traffic to unhealthy pods and ensure automatic recovery if something goes wrong.
Step 8: The Pod Becomes Reachable
If a Service is associated with the pod, Kubernetes updates the Endpoints object to include the new pod’s IP.
If an Ingress or LoadBalancer is configured, external traffic is routed to the pod.
At this point, your pod is fully running and accessible!
Final Thoughts
The simple act of running kubectl run nginx triggers a complex sequence of events inside Kubernetes.
Understanding these steps can help you debug issues, optimize deployments, and master Kubernetes internals.
👉 Want to go deeper? Next, we’ll explore how Kubernetes scales and reschedules pods when a node fails. Stay tuned! 🚀